Showing posts with label drawing. Show all posts

Tuesday, 22 April 2014

Grade 11 and 12 Drawing for MTDTD Sourcebook

Your A3 drawing will double up as part of preparing a University Portfolio.

The Weeping Cathedral
Artist: Andrew Nair
Medium: Graphite pencil on paper


Morning Glory
Artist: Andrew Nair
Medium: Graphite pencil on paper

Link to Mrs Moore's post

Thursday, 24 October 2013

Grade 10 Prac exam


click here to view Mrs Moore's post


Example by Zama Zikhali


NB study the shape of the body- its made up of a sphere (ball shape) 
and cylinder cup like shapes... 


Monday, 14 October 2013

Grade 9 Figure drawing project

Below are the images on your worksheet from Mrs Moore's blog (http://studio238dghs.blogspot.com/2012/11/stereotypes-drawings.html ).  You can also create a figure drawing made up of your own objects.


Friday, 5 July 2013

Nursery Rhymes: Concept drawing: Task 4

Concept Drawings


You will need to showcase your drawing ability for your future portfolio. Create a tonal drawing based on your chosen nursery rhyme.

This means to showcase your ability to create illusions of space and of form.
It also means to showcase your compositional abilities.

Now create a compositional drawings in any medium or combination of media. Each should be roughly A4 in size, depending on the media you have chosen and the shape of the format you have chosen.

Hint: Work in the middle of an A3 page as you develop the composition. This leaves you lots of room to crop and to add. Avoid always putting the focal area in the middle - boring!

See the links below for tips:

the-secret-of-good-composition link

http://emptyeasel.com/2006/11/24/9-steps-to-creating-better-compositions/

http://willkempartschool.com/perspective-drawing-for-beginners/

Starting with a good reference photo will ensure a successful composition.

make sure you have a strong focal area and that your range of light and dark tones add to the focal area and illusion of depth.

Nursery Rhymes: Task 3: thumbnail sketches

  
Task 3: Thumbnail Sketches & Experiments

Now create your own A3 page of drawings to arrive at your final intention. These are your 'thumbnail' sketches.
You may use any media / materials to create any meaning / mood.

If you trying out new media (in Grade 11), create another A3 page showing your tuition and experiments. Make your mistakes here and reflect on them.

Develop a certain set of skills that will happen you achieve the ideas laid out in your thumbnails.

Present your skills acquired as part of your A3 experiments page.

some thoughts about designing with Thumbnail Sketches
"Don't fret over details. Use thumbnails to establish approximate locations for major elements. (the examples described above may actually be "too perfect" — don't worry about making "pretty" pictures.)
Try for an approximately proportional page size (if doing sketches for a full page layout) but don't get out the ruler. You're aiming for a general idea of how the piece might look." Jacci Howard Bear (http://desktoppub.about.com/cs/basic/a/thumbnails.htm)

link to clip on transposing thumbnails into final sketches

Experiments...
Below are some links to tutorials that will help you identify skills you could develop in your practical work.
Drawing: expressive markmaking (http://studio2-41.blogspot.com/2013/01/mark-making-in-drawing.html),  foreshortening (http://studio2-41.blogspot.com/2013/05/foreshortening-notes.html) in drawing/ studying anatomy and proportion.

Compositional techniques
http://willkempartschool.com/drawing/

Wire binding for 3-dimensional wirework/ jewellery
creating a wire bead cage
caged bead wire earrings
creating a wire horse/ practising wirework using solder
basic wire weaving
basic wire techniques
joining chicken mesh
creating a wire bird


Stitching techniques if using embrodiery/ how to use the sewing machine/ pattern creation/ sewing with unusual materials.

Photoshop techniques for editing photos.

You could also experiment with Bronwen's Gesso technique as an experiment.
clip explaining gesso properties

Some Painting revision:
colour mixing

painting posts

packing tape transfers

Tuesday, 21 May 2013

Foreshortening notes

fore·short·en  (fôr-shôrtn, fr-)
tr.v. fore·short·ened, fore·short·en·ing, fore·short·ens
1. To shorten the lines of (an object) in a drawing or other representation so as to produce an illusion of projection or extension in space.
2. To reduce the length of; curtail or abridge.

The American Heritage® Dictionary of the English Language, Fourth Edition copyright ©2000 by Houghton Mifflin Company. Updated in 2009. Published by Houghton Mifflin Company. All rights reserved.


The following notes were taken from http://www.idrawdigital.com/2010/04/tutorial-foreshortening-tricks/


Wednesday, 13 March 2013

Grade 10: Tone

Grade 10's See if you can use your knowledge of tone to answer the following questions.

You may record your answers as comments or email your teacher a link to a Google doc or hand write them.

link to Google docs (note you need a G mail address to use this feature) 


Fig. 1.  Old Master’s drawing.
Study by Luca Cambiaso, 1527-1585
image from
http://www.losinaartcenter.com/blog/

1.1 What direction is the light coming from in this drawing by Cambiaso? Substantiate your answer by referring to "visual clues".  [3]


1.2 Some art students stated that "the light reveals the dimensionality of the objects"

Explain what they mean by this statement by discussing the role of tone in an artwork. Make sure you clarify the following terminology on your discussion:  [8]
                 highlight [1], reflection [1], cast shadow [1], form shadow [1], tone/ value [2], illusion of form [1], light [1]

1.3.1 What is meant by the term "tonal range".  [1]
      1.3.2   Use at least 3 different pencils to create a diagram that supports your answer. [3]


Unfortunately the model for a life-drawing class was absent for a drawing class in Losina so the teacher constructed a reclining figure from boxes.  Below are some sample drawings from the class.


Many artists improve their observational skills and drawing abilities by breaking figures into basic shapes.


http://chrisgentes.com/tag/drawing/

Below are images from a tutorial by Frank Robert Dixon


 images from http://www.frankrobertdixon.com/practice/4-shapes/


"May I repeat what I told you here: treat nature by means of the cylinder, the sphere, the cone, everything brought into proper perspective so that each side of an object or a plane is directed towards a central point. Lines parallel to the horizon give breadth... lines perpendicular to this horizon give depth. But nature for us men is more depth than surface, whence the need to introduce into our light vibrations, represented by the reds and yellows, a sufficient amount of blueness to give the feel of air. "


-Paul Cezanne, Letter to Emile Bernard, April 15, 1904
http://www.quoteland.com/author/Paul-Cezanne-Quotes/3656/

2.1 See if you can apply your knowledge of tone, by creating an illusion of a 3-dimensional figure made from boxes/basic shapes.   you will be assessed on the following criteria:
  • tonal range [5]
  • illusion of form[5]
  • use of basic shapes [5]
  • consistent light source [5]
  • use of materials and technique (mark-making and use of putty eraser, paper stumps, pencils/ charcoal/ graphite/pen and ink/pen/conte) [5]
  • overall impression (i.e originality and creativity) [5]

drawing total: [30]

exercise total: [45]

Link to 51 aspects to consider in a drawing


Wednesday, 6 February 2013

Grade 8 & 9: Texture Rubbings


Place a piece of white paper over various textures and 'rub'over it with a crayon or pencil or charcoal to create a texture rubbing.  You will then create a colllage or pattern with your rubbings.

http://www.guardian.co.uk/artanddesign/2009/sep/19/drawing-guide-rubbings-texture


See Susan Lee's example below:
http://soulaura777.deviantart.com/art/25-Texture-Rubbings-163986920


https://www.msu.edu/~lonerga1/texture%20projects.htm

See more of Susan Wieselnick's work at : http://graphicemotion.com/cad_binkiefence.html


Kayla Race has turned her textures into a stamp!
http://fineartamerica.com/featured/texture-rubbings-pattern-linocut-print-kayla-race.html

Tuesday, 5 February 2013

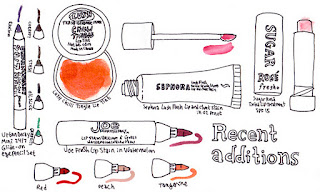
Grade 9: Cosmetics drawings

Don't forget to bring cosmetics for our drawing lesson!


http://www.flickr.com/photos/jelles/1802525483/


http://genxsters.wordpress.com/2007/12/08/edm-challenge-11-draw-glasses-or-sunglasses/


http://www.examiner.com/article/yum-yum-fall-09-shoe-preview
Cosmetic Products Collection Royalty Free Stock Vector Art Illustration

http://www.istockphoto.com/stock-illustration-19672890-cosmetic-products-collection.php
http://juliaminamata.blogspot.com/2012/02/recent-additions-to-my-collection.html


http://exhibition30days.wordpress.com/
Lipstick
http://lenythegreat.wordpress.com/2008/04/
Mondrian nailshttp://www.makeupmuseum.org/home/trends/


Thursday, 31 January 2013

mark making in drawing


Adam Duncan suggests one creates a "library" of marks....read more at http://www.elfwood.com/farp/theart/adpencil/adpencil004.html

mark making exercise
http://drawsketch.about.com/cs/drawinglessons/a/exploringmarks.htm

you can then use your collection of marks to create illusions of various textures and tones...


Wednesday, 19 September 2012

Artists Books: check out Cheryl Penn's website if you are interested in this technique


THE READING ROOM: ARTISTS’ BOOKS
Artist: Cheryl Penn
KZNSA Gallery


Night Crossing


Link to Cheryl Penn's site

Revision: aerial/atmospheric perspective

Grade 8's
revise the definitions of perspective as well as the principles of aerial perspective.


File:Frans Koppelaar - Landscape near Bologna.jpg

Title: Landscape near Bologna
Painter: Frans Koppelaar
Year: 2001


File:Mount Feathertop, Australia - May 2005.jpg


Aerial perspective or atmospheric perspective refers to the effect the atmosphere has on the appearance of an object as it is viewed from a distance. 

As the distance between an object and a viewer increases, the contrast between the object and its background decreases.

The background become less detailed and the colours are duller (less saturated, ie. greyer or bluer or redder in a sunset...)