Monday, 15 July 2013

Grade 10: Acrylic painting

 Create a surreal composition, using an egg.
  
 Thumbnail Sketches & Experiments


link to clip on transposing thumbnails into final sketches


Paint in the cool dark colours first, then add warm colours and lastly some blending with oils.


Monochrome under-painting


We will start our surreal egg paintings by creating  illusions of form and space using one dark colour and white. (A monochrome) This is a very old traditional technique used by Vermeer.


However, we will use acrylics for our monochrome because it dries faster. Mix your own dark - try and avoid using black. Remember to work into both figure and ground.

We will work over the monochrome (the 'grisaille') with  local (representational) colours.

 Lastly, we will use oil paints to blend and adjust the colours and tones.


Link to a tutorial
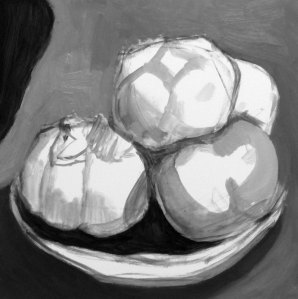
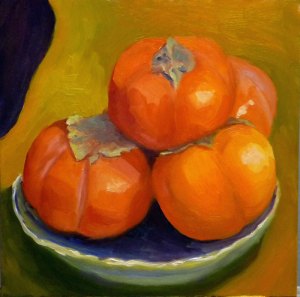
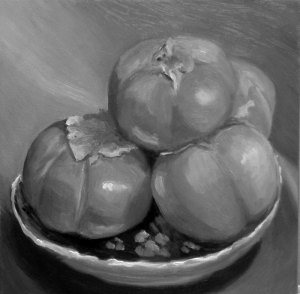
#2- Continuing monochrome acrylic underpainting #4 - oil painting cont. B&W photo to check values of finished painting
this artist takes a black and white photo to check her values at the end of her painting, read more by clicking on her blog below.
http://janabouc.wordpress.com/2008/12/08/pile-o-persimmons/


http://artid.com/members/eleanormcintosh/blog/post/4392-oil-painting-using-an-underpainting
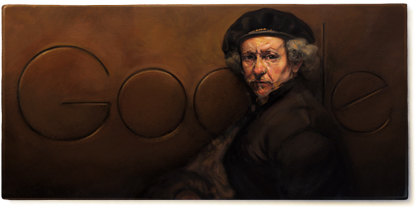
Rembrandt van Rijn's 407th birthday
it's Rembrandt's 407th birthday today.

Some Painting revision clips:

colour mixing

painting posts

packing tape transfers

Tuesday, 9 July 2013

Grade 8: Three dimensional Jewellery Pendant

 Wire Wrapped Pink and Black Heart Pendant
 Wire Wrapped Doll Pendant with Rose


http://www.artfire.com/ext/shop/product_view/moonpixie/5909477/handmade_wire_recycled_washer_fluorite_little_man_pendant_necklace/handmade/jewelry/pendants/wire_wrapped

http://jewelrymaking.craftgossip.com/jewelry-tutorial-from-alma-stoller/2011/03/12/

You will be studying the role of jewellery in society and inspiring artworks and artists.

You will be creating a Jewellery Pendant based on the theme: _________________________. You will also be learning a variety of technical skills as part of the design process and must produce a sourcebook on the discoveries you have made.

Your Pendant must fulfill the following criteria:

-        Visual clues that link your work with theme
-       No scratchy/ uncomfortable elements that will hurt the marker/ wearer
-       It must be 3-dimensional
-       It must have a bayle (hanging device) that allows you to attach it to a chain
-       Your work must be technically skilled (i.e no unsightly joins & you must use some of the techniques you have explored in your sourcebook in your final product)
-       Your piece must be functional, therefore it cannot be larger than 12 cm cubed
-       Please note that you may not use any bought (i.e commercially made) elements and some of your materials must be recycled.

    • Begin by completing the experimentsàCreate a sourcebook of samples and notes on the techniques you have learntà draw your design for your final piece and collect materials:
     Hand sourcebook in on: ____________
    •  Check that your design is approved by your teacherà start making the final product!!! à Hand in Jewellery pendant in on:________________
Task 1: Analyse inspiring artists  and the function of jewellery in society.

Task 2: Collect materials  & begin TECHNICAL EXPERIMENTS

You must complete a minimum of 4 techniques from all different categories.  Please consult with your teacher if there are additional techniques you would like to explore.

 You must complete a minimum of one technique in 4 different categories.
  1. Metal work: reprocie
Materials:

-       tin cans
-       old ball point pen

Methods:

- cut off the tops of a cool drink can and down the centre of the can to create a flat sheet of metal
- sand edges of can
- draw onto the coloured side of the tin cans with old ball point pens to create indentations
2. Paper beads
-       paper
-       woodglue
-       vaseline
-       toothpick/
nail/ straw
- coat paper in woodglue and wrap around vaselined toothpick/ nail/ straw
-note that cutting the paper in different shapes will alter the shape of your bead

3. Fabric Flowers
- fabric
-candle
-needle and thread

-       cut circles of various sizes form different materials, burn fabric edges by holding the material close (not in) to a flame
-       stitch together to create layered flowers
-       you can add felt or buttons

4. Plastic beads
- plastic (coke bottles work well)

-       cut a coke bottle into strips (note that horizontally cut strips will create different effects to vertically cut strips)
-       use a pair of tongs to dip strips into boiling water,
-       be careful of steam burns
-       Also experiment with using the heat gun to melt plastics

-       Note the different melting points of different types of plastics.
5. Creating shapes & forms
(spar yoghurt lids, cleaning agents, duck….)
-       Cut plastics into different shapes and use a craft knife to score fold lines. Bend plastic and secure by stitching/using jump rings/glue
-       See what types of designs you can create by drilling holes and joining various colours of plastics/paper


6. Wire Work
Soft wire to practice techniques, pliers, firmer wire for final products
See online tutorials for instructions and joining techniques.
Jump rings can be created by wrapping wire in a spring shape around a wooden dowelling rod and cutting with wirecutters.
7. Creating Fabric balls/ fabric wrapping


Fabric, cotton, needle, scissors,
Beads are optional.
Cut fabric into strips, fold sides and roll into ball shapes.
Secure ends by stitching. You can add beads for decoration. See online tutorials for tips.
You can also achieve great effects by experimenting with wrapping wire in material and securing it with thin copper wire using similar method to hand stitching.
8. Stitching techniques
Needle & cotton
Crochet or knitting needles, suitable fabric/ wool.
See what types of hand stitches you can use to create aesthetically pleasing work. 

Experiment with crochet and knitting techniques ( you could even ask your gran to teach you some techniques).  

You could also experiment with knitting/ weaving using wire…

Task 3: Assemble your Sourcebook: include samples of your experiments ( displayed in plastic bags provided) as well as notes on what you have learnt.

Task 4: DRAW YOUR DESIGN
When you start designing make sure you use the elements and principles of art such as:
BALANCE<COLOUR>LINE<SHAPE>TRANISITION>INTEGRATION>HARMONY>PATTERN

Task 5: Create your Final product

Links to various online tutorials:
Handstitching
handstitching tutorials

Fabric ball tutorial

Wire binding for 3-dimensional wirework/ jewellery:

Very Informative clip on basic wire techniques and creating animals

link to wire tree tutorial
link to tree of life tutorial
creating a wire bead cage
caged bead wire earrings
creating a wire horse/ practising wirework using solder
basic wire weaving 

joining chicken mesh
creating a wire bird

Monday, 8 July 2013

Photograhy Examination Requirements


NOTE: Learners selecting photography as their chosen discipline must adhere to the following guidelines:
TRADITIONAL PHOTOGRAPHY
a) Produce a set of at least FIVE different wet [traditional] photographs.
b) Black and white or colour
c) Development of both the film and negatives must be done by the candidate at school under supervision of the educator.
d) All contact, test strips and record of the process must be placed in the examination book.
e) Final prints must be separately mounted on black, white or grey cardboard and either pasted into the work book or submitted in a folder if it is too large for the source book.
f) The final print size must be 20cm x 25cm, or larger.
Assessment will take into account:

i) Interpretation and communication of concept.
ii) Composition of pictorial elements.
iii) Technique and print quality.

DIGITAL
a)  Produce a set of at least FIVE different original digital prints.

     These may only be reworked on/ adapted at school.  
You must hand in a folder of supporting evidence that shows the steps you have taken to alter your original images.  This is as important as the final product.

http://www.education.gpg.gov.za/Learners/Documents/exam_instruction_18_of_2012.pdf


Friday, 5 July 2013

Nursery Rhymes: Final Sourcebook Content

Notice that you should aim for AT LEAST 5 x A3 pages.

1.  Mind mapping and/or brainstorming (+/- 5 practical and conceptual ideas) - illustrated with thumbnails 

2.  Investigation of inspiration (Rosemarie Marriot/Vaughan-evans Infographic+other artists? examples? all   referenced) - illustrated

3.  Experimentation with materials (problem-solving) - photos and samples

4.  Concept drawing (at least an A4 tonal study)- this can be your final intention sketch for no. 5

5.  Development of final ideas - illustrated in final intention (one for exam prac, 1 for term 3 pat) 

6.  A summary which will be your written final proposal / intention 

7.  Reflection (SWOT analysis of your idea) - to be done in class

Nursery Rhymes: Damien Hirst Example


Damien Hirst, This little piggy went to the market, this little piggy stayed home, 1996.
Steel, glass, pig, formaldehyde solution, electric motor.

The pig is sliced down the middle and displayed in two separate tanks. Driven on
a plinth by motorised pulleys, this animal constantly passes itself, showing the
futile rat race of life.